Welcome, fellow lifters! With over two decades in the trenches as a nutrition expert and bodybuilding coach, I’ve witnessed the transformative power of the deadlift firsthand. Today, we’re diving deep into the sumo deadlift, a staple in any serious strength or hypertrophy program. While often debated against its conventional counterpart, the sumo deadlift is a formidable exercise that, when performed correctly, can unlock incredible gains in lower body strength and development.
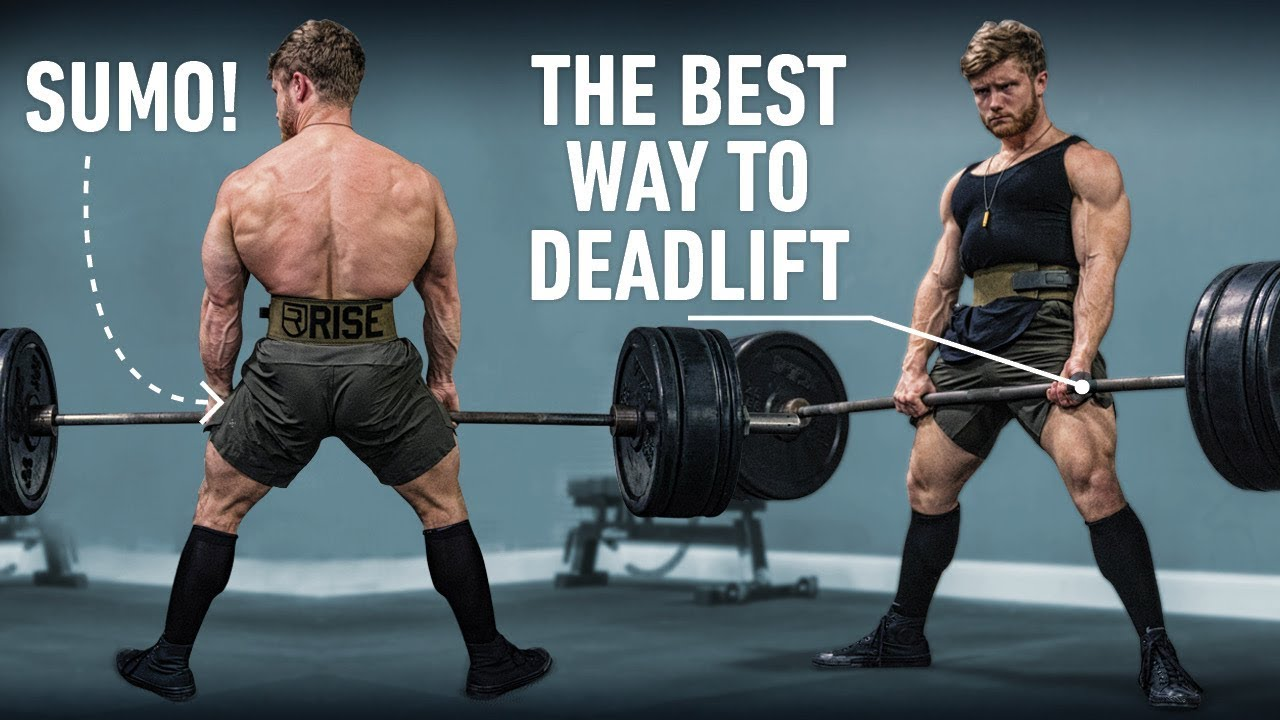
Sumo vs. Conventional: Understanding the Differences
Before we dissect the sumo deadlift’s mechanics, let’s briefly touch upon its relationship with the conventional deadlift. Although they share similarities in their overarching movement pattern and muscle activation, distinct technical differences set them apart.
The most glaring distinction lies in your hand and foot positioning. In a sumo deadlift, your hands grip the bar inside your legs, while your feet are positioned much wider. Conversely, in a conventional deadlift, your hands are outside your legs with a narrower stance.
Research, such as studies by Escamilla and colleagues, suggests that the sumo deadlift places a greater emphasis on the quadriceps, whereas the conventional deadlift tends to challenge the spinal erectors more significantly. However, both variations remain potent full-body exercises.
Choosing between sumo and conventional often comes down to individual comfort and anatomical leverage. What feels natural and allows you to generate the most force will likely be your strongest pull. That said, to cultivate well-rounded strength and mastery of fundamental movement patterns, I often recommend periodically incorporating both variations into your training. Don’t be discouraged if sumo feels awkward initially; with practice, it might just become your preferred method due to its biomechanical advantages for certain body types.
Muscular Engagement: What Does the Sumo Deadlift Work?
Like the squat, the deadlift is a compound movement that primarily involves hip extension (straightening of the hips) and knee extension (straightening of the knees). However, in the deadlift, hip extension is the dominant action, unlike the squat which is more knee-dominant.
Here’s a breakdown of the key muscles activated during a sumo deadlift:
- Glutes and Hamstrings: These are the primary drivers of hip extension, providing the explosive power to lift the weight off the floor. Think of them as the engine of your pull.
- Quadriceps: Responsible for knee extension, your quads play a significant role, particularly in the initial pull, more so in the sumo variation.
- Spinal Erectors: These muscles run along your spine and work isometrically (contracting without changing length) to maintain a rigid, neutral spinal position throughout the lift.
- Lats and Traps: These upper back muscles act as crucial stabilizers around the shoulders and scapulae. By “packing” your lats, you create tension that keeps the bar close to your body and prevents it from drifting forward.
Despite the significant involvement of the back for stabilization, I always view the deadlift fundamentally as a lower body exercise. I typically program it on leg days, recognizing the glutes, hamstrings, quads, and spinal erectors as the primary movers and targets for growth.
Programming the Deadlift: Maximizing Gains
Given its multi-joint nature and the large muscle groups it engages, the deadlift is exceptionally conducive to progressive overload. This means it responds well to heavy loads and can significantly drive strength and muscle growth.
- Rep Ranges: For hypertrophy (muscle growth), aim for 5-10 repetitions. For pure strength, focus on 1-5 repetitions.
- Frequency: The deadlift is immensely demanding, both physically and mentally. Even for advanced lifters, I recommend programming it no more than once or twice per week to allow for adequate recovery. Pushing it too frequently can lead to burnout, overtraining, and an increased risk of injury.
Sumo Deadlift Technique: A Step-by-Step Guide
Perfecting your sumo deadlift technique is paramount for safety and effectiveness. Let’s break it down from the ground up:
Footwear, Apparel, and Equipment
- Footwear: Opt for flat-soled shoes (like Chuck Taylors or dedicated deadlift slippers) to maximize stability and minimize any energy loss through compression.
- Socks: Wear high socks to protect your shins from scraping against the bar, which is a common occurrence, especially with the close bar path of the deadlift.
- Belt (Optional): A 10mm lever belt can be beneficial. It increases intra-abdominal pressure, enhancing core rigidity and force transfer during the pull.
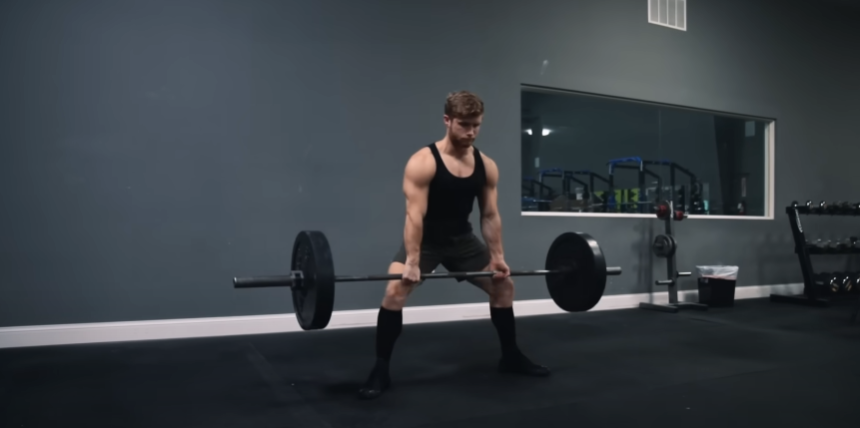
Setup: Approaching the Bar
- Bar Positioning: Approach the bar so your shins are approximately half an inch away, with the bar roughly centered over the middle of your foot (often aligning with the tongue of your shoe when looking down).
- Sumo Stance: Take a wide stance, moving your feet as far laterally as comfortable while ensuring your heels remain in line with your knees. If a full sumo stance feels too restrictive initially, gradually work your way into it over several weeks. This might involve stretching and foam rolling your inner thighs and groin to improve flexibility.
- Foot Flare: As your stance widens, you’ll need to increase your foot flare. In a full sumo stance, your toes should point outwards by about 30-40 degrees, aligning with the direction your knees will travel.
- Hinge, Don’t Squat: To get your hands to the bar, initiate with a hip hinge, pushing your hips back as if performing a stiff-leg deadlift. Once your hips can’t go back further, allow your knees to bend slightly forward and out (in line with your toes) as your hips continue to drop until you can comfortably grasp the bar. Avoid simply squatting straight down, as this can place you in a less optimal starting position.

Grip: Securing the Bar
- Grip Width: Generally, grip the bar with your arms hanging straight down at shoulder width. Some lifters prefer a slightly wider grip in sumo to prevent their hands from hitting their quads at lockout, but a shoulder-width grip is often stronger and perfectly viable.
- Grip Type Options:
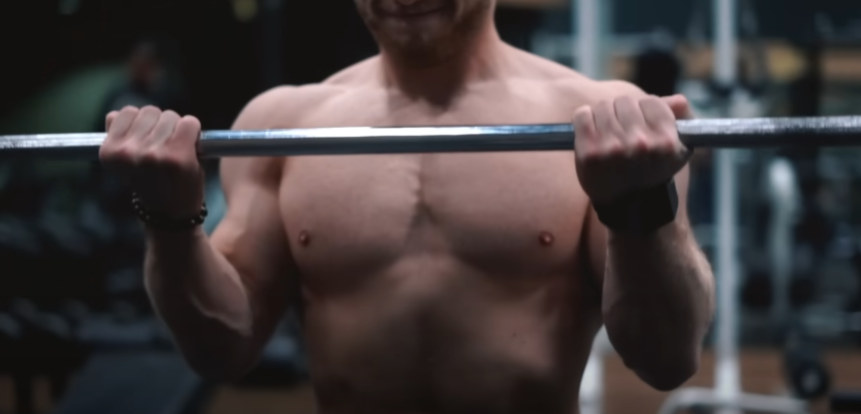
- Alternated (Mixed) Grip: One palm faces up (supinated), and the other faces down (pronated). This grip typically allows you to lift the most weight by preventing the bar from rolling. To minimize potential muscle imbalances, switch which hand is pronated/supinated occasionally. While some anecdotal reports suggest an increased risk of bicep tendon tears on the underhand side, it’s relatively uncommon in my experience, and it’s the grip I personally utilize.
- Double Overhand Grip: Both palms face down (pronated). This is the safest grip but is often limited by grip strength, potentially preventing you from lifting your true deadlift maximum.
- Hook Grip: This involves wrapping your fingers over your thumb, which is wedged between your hand and the bar. It significantly enhances grip strength for a double overhand pull but has a notoriously painful adjustment period.
- Lifting Straps: These allow you to use a double overhand grip without being limited by grip strength. While beneficial for heavy sets, I recommend performing at least one heavy working set per session without straps to ensure your grip strength develops in tandem with your pulling strength.
- Dig In: Regardless of your chosen grip, dig the bar into the base of your hand, specifically driving your pinky finger into the bar. This helps create a more secure grip and reduces forearm fatigue.
The Pull: Initiating the Lift
- Pack the Lats: Once your grip is set, actively pack your lats by imagining you’re trying to pull the bar into your body or breaking the bar across your thighs. This tension will help keep the bar close throughout the lift and prevent it from drifting forward.
- Neutral Spine: Establish a neutral lower back position, creating a slight stretch in your hamstrings. Maintain this flat lower back throughout the entire concentric (lifting) phase. A slight rounding in the upper back (thoracic spine) is generally more acceptable and less risky, but ensure it doesn’t increase during the lift.
- Take a Breath: Without dropping your hips, take a deep breath into your belly, bracing your core.
- Lean Forward (Slightly): Shift your body weight slightly forward so that you can draw a perfectly straight vertical line connecting your scapula, the middle of the bar, and the middle of your foot. This ensures optimal leverage.
- Pull the Slack Out: This is a critical step often missed by beginners. Apply a small amount of upward tension to the bar until you feel the “slack” come out. You’ll hear a slight click as the bar rises a millimeter and the plates press against the sleeves. Do not “grip and rip” the bar, yanking it off the floor forcefully. This can cause the plates to suddenly hit the ground, throwing you off balance and wasting energy.
The Ascent: Lifting the Weight
- Explosive Power: With the slack out, initiate the pull with explosive power, driving your feet into the floor and leading with your chest.
- Hip Drive: The primary focus should be on driving your hips forward powerfully. Thinking too much about “pushing the floor away” can sometimes turn the deadlift into a squat, causing your hips to shoot up prematurely. Remember, the deadlift is a hip hinge movement.
- Maintain Isometric Contractions: Throughout the concentric phase, maintain:
- A strong isometric contraction in your lumbar spine to prevent rounding.
- Retracted shoulder blades to keep your upper back tight.
- Tension at your shoulders, actively pulling the bar in close to your legs.
- Straight Bar Path: When viewed from the side, the bar should travel in a perfectly straight vertical line, directly over the middle of your foot, dragging up against your shins.
The Lockout: Finishing the Rep
- Knee Lockout: Straighten your legs to lock out your knees.
- Hip Lockout: Squeeze your glutes powerfully to extend your hips fully.
- Shoulder Lockout: Simply lift your chest up.
- Avoid Over-Lockout: Do not hyperextend your lower back by leaning excessively backward. There’s also no need to needlessly squeeze your shoulder blades together or shrug the weight. This adds unnecessary stress to your spine.
The Descent: Controlling the Negative
The eccentric (negative) phase of the deadlift is often debated. While some powerlifting coaches advocate for simply letting the bar drop while guiding it, I offer a more nuanced approach.
- Controlled Negative for Consistency: If you’re new to the deadlift or still refining your technique, I highly recommend controlling the negative for approximately one second. This ensures each repetition starts from a consistent, optimal position, minimizing the risk of losing form.
- Minimize Recovery Burden: For experienced lifters, actively resisting the negative can make the deadlift even more physically demanding and impact recovery within the session and in the days following. If recovery is a concern, a less controlled, but still guided, descent can be beneficial.
- Initiate with Hips Back: To lower the weight, start by setting your hips back first, just like you would in a stiff-leg deadlift. Once the bar is about to clear your knees, then allow your knees to bend, letting the bar return to the floor in a perfectly straight line.
- Avoid Knee-First Descent: Do not initiate the negative by bending your knees first. This will force the bar to move forward to avoid hitting your knees, throwing off your starting position for the next rep and wasting energy.
- Full Reset: Allow the plates to come to a complete and full rest on the ground after each repetition. Do not “bounce” the plates off the floor, as this reduces the effectiveness of the lift and can be dangerous.
The Path Forward
The deadlift is a highly technical lift, and mastering it takes time and consistent effort. We’ve covered the intricacies of the sumo deadlift today. Next, we’ll delve into conventional deadlift technique, and in a subsequent session, we’ll address common form errors for both variations and provide solutions to help you break through plateaus.
To support your journey in building strength and muscle, I’m offering a special launch discount. For the next week, you can get 25% off my Fundamentals Hypertrophy Program and the Push-Pull-Legs Intermediate to Advanced Program. Find more information and grab your programs at Jeffnippard.com or through the links in the description below.
Thank you for tuning in! If you found this guide helpful, please hit the like button and subscribe for more in-depth training content. I’ll see you in the next episode!